Jump to content


Recommended Posts

Posted

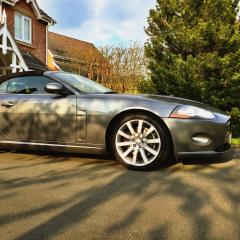
So I have owned this car for 5 years now, can't believe its been that long, and it has hardly been driven for ages. I took it off the road three and half years ago when I was charged the ULEZ fee for driving in central London. At the time it didn't meet the ULEZ compliance and I wasn't going to pay £12.50 every time I was in the city, at least 3 times a week, to the robbing Mayors office. Since then the TFL database has been updated and low and behold my car is now compliant. Hoorah! So no more ULEZ fee, for now, especially if they extend again to M25. The robbing gits!!

It needed a little bit of work, nothing too serious, but thought good time to change. So I got myself a VW Up for running around in as cheap to run, Group 2 insurance, 0 road tax and 60 mpg.

Tried at one point to trade in the Jag on a brand new car and got offered £372 for it against a £34K motor. Absolutely shocked as the newly refurbished sport wheels were worth more than that on their own. So decided to SORN it and do the work on it slowly and keep it as it is a !Removed! lovely car to drive and only got 48500 miles on the clock.

Now thinking that, as nearly 20 years old, its getting on for being a classic!!! I'm going to keep her and fiddle and fettle and drive like Miss Daisy every now and then!

I am still working on it as I have recently bought and replaced the front suspension on both sides. Had some knocking when hitting small bumps etc. Front shocks were definitely past their best and the fact that have to remove whole unit to replace thought might as well do top mounts etc in the process. So bought parts bit by bit, as funds allow, to do the job. NOT as easy as it looks on YouTube video. Well not at first.

Took 3 days to remove the passenger side and ended up ruining the lower arm bush in the process. So decided to stop with the excessively large hammer and save up and buy 2 new lower arms as well. Removing that as a very whole unit made life so much easier. Drivers side I had completely dismantled in 2 hours. Will do a separate write up about the process later as learnt a couple of little things along the way.

This gave me the chance to wire brush and treat the chassis while clear and also the hub carriers got a bit of TLC before reconstruction. Whilst having the room to move I also replaced the anti roll bar bushes with polyurethane ones.

Both sides are now rebuilt and the car is back on all 4 wheels.

Also tried out, with success, the Meguiars refurb kit for foggy headlamp glass. bit of patience and they have come up a treat. Would definitely recommend using, although have read that Arm and Hammer toothpaste has the same effect.

Due to start chassis TLC on rear end when I stop sweating buckets and fancy laying underneath for a few hours. Sure I'll find other issues while about it. But, luckily, as not needed on road can take my time. 

Currently in process of trying to work out which door thinks its permanently open! Also the ashtray flap surface has deteriorated horrendously, sticky and horrible to touch, and I refuse to spend 70 odd quid on a new one. So have rubbed this down to plastic and in process of coming up with a plan to decorate the flap and refit. Pics to follow if it works out.

I've also bought the interior up to latest technology by replacing the cigar lighter with a USB connector. Am currently considering and investigating replacement of entertainment system but am arguing with myself over keeping originality or making better for my requirements.

If you've not fallen asleep reading my ramblings will add to this periodically with further updates and maybe some piccies. When I get one of my kids to teach me how to down and upload these new fangled digital wonders of photography. I thought pasting pics up involved some double sided sticky tape and putting them in an album!! Apparently not!

Posted

Front Shock Absorber replacement


So as I mentioned above I have recently replaced the front shock absorbers. Now to do this you have to remove the whole unit as one. Shock, spring and Hub carrier.

Watching some instructional videos I felt ready to give it a go, thinking I know I'm not in a workshop, so weather is going to come into play, as is sitting on my driveway with the car being supported on axle stands where the jacking points are. I placed 2 bits of 3x2 wood on the sills and then the axle stand under the wood to protect the car. 

Removal of the brake callipers was fairly straight forward, and I hung these from the spring for the time being to save disconnecting the brake line. Don't forget to unclip the brake hose from the bracket secured to the shock.

Disconnect the ABS sensor carefully. I taped over the 2 connectors to protect from dust and dirt.

Undo the Anti Roll Bar drop link, and I recommend undoing both sides at once and rotating the roll bar upwards. This made so much difference later on for me, but only discovered this by trial and error.

You need to undo the pinch bolt that holds the shock into the hub carrier and the Torx bolt that holds the hub carrier to the lower swing arm. Torx bit is T55. Then using a wedge, or large screwdriver, or cold chisel!! spread apart the hub carrier from the swing arm spigot.

Before I continue I would like to add that I had spent a week or so soaking all the bolts and nuts with WD40 in preparation. Saying that its still a struggle at times as most of the bolts are thread locked as well as rusty. But I didn't have to resort to any heat, thankfully.

I also undid the rear bolts holding the subframe and allowed the frame about 25 mm of movement.

Undo the hub nut, 32mm, and discard the nut. New one definitely required on refit. I struggled at first, then borrowed my neighbours battery impact wrench and it came off a dream. So invested in my own for opposite side. Also great for wheel nuts that have been put on by garage with gun!

Undo the track rod and split the join removing the track rod end from the hub carrier. I then tied this up out of the way also. 

Gentle tap with a drift and hammer on the drive shaft started to separate that from the splined hub carrier. 

Now in theory if you undo the three retaining nuts in the engine bay on top of the Shock and everything else is removed and loose the whole unit should drop out of the suspension turret and lift off of the lower swinging arm. OH NO! It didn't! I tried jacking up the whole unit to straighten the join to the swing arm for the spigot to drop out of the hub carrier. No joy. After much swearing and cursing and trying many different angle and approaches, myself and my neighbour (great mechanically minded chap)(years of running LR's and his XJ6) we resorted to a bit of brute force to try and split the joint. This after a few hours resulted in me ruining the bush on the lower swing arm!! End of play for the day. Resort to drawing board, regroup and plan new angle of approach.

I then read up on removing swing arm altogether as this looked like it might be easier. 2 bolts hold it in place what could be more difficult I hear you say. Well! Firstly remove the plastic wheel arch trim to get to the bolts. Then the front horizontal bolt screws int a captive nut BUT there is an zircon pipe that runs just slightly in the way of getting a socket on the nut. So I used a door wedge to push gently the pipe up Then could get a ring spanner on and using a short length of scaffold tube as a lever got the bolt moving. Ratchet spanner did the rest. 

The rear bolt is a nut and bolt and came undone easily until you realise that the bolt has to go up to remove it! Great as the bolt is something like 125mm long and the gap between the top of swing arm and chassis is about 25mm!!! Mmmm what way do we go now. I saw a video of someone using multiple spanners and crowbar and eventually after much hard work managing to wriggle it out. Far too much for me. So I ordered 2 new nuts and bolts at a cost of £6 total (genuine Jag from Jag Classic parts) and hacksawed the old bolt off at the top so it could drop out. On refitting just put the bolt in from the bottom and nut on top. Its loctited and torqued. Bobs your uncle and all that sorted.

Now when I slid the whole swing arm out of the chassis the whole unit came away easily and the hub carrier just fell away from the spigot no problem. 

Compress the spring to remove the top mount bolt and then you can remove the top mount bearing and then slide off the spring. You do need to compress the spring considerably to be able to relieve tension on the mount. I used 2 sets of spring compressors to do the job safely.

Using a rather large hammer I knocked the hub carrier off the old shock with a bit of wood between to protect metal and removed the 2 brackets from the shock for re use.


Posted
1 hour ago, Colin Mac said:

Front Shock Absorber replacement


So as I mentioned above I have recently replaced the front shock absorbers. Now to do this you have to remove the whole unit as one. Shock, spring and Hub carrier.

Watching some instructional videos I felt ready to give it a go, thinking I know I'm not in a workshop, so weather is going to come into play, as is sitting on my driveway with the car being supported on axle stands where the jacking points are. I placed 2 bits of 3x2 wood on the sills and then the axle stand under the wood to protect the car. 

Removal of the brake callipers was fairly straight forward, and I hung these from the spring for the time being to save disconnecting the brake line. Don't forget to unclip the brake hose from the bracket secured to the shock.

Disconnect the ABS sensor carefully. I taped over the 2 connectors to protect from dust and dirt.

Undo the Anti Roll Bar drop link, and I recommend undoing both sides at once and rotating the roll bar upwards. This made so much difference later on for me, but only discovered this by trial and error.

You need to undo the pinch bolt that holds the shock into the hub carrier and the Torx bolt that holds the hub carrier to the lower swing arm. Torx bit is T55. Then using a wedge, or large screwdriver, or cold chisel!! spread apart the hub carrier from the swing arm spigot.

Before I continue I would like to add that I had spent a week or so soaking all the bolts and nuts with WD40 in preparation. Saying that its still a struggle at times as most of the bolts are thread locked as well as rusty. But I didn't have to resort to any heat, thankfully.

I also undid the rear bolts holding the subframe and allowed the frame about 25 mm of movement.

Undo the hub nut, 32mm, and discard the nut. New one definitely required on refit. I struggled at first, then borrowed my neighbours battery impact wrench and it came off a dream. So invested in my own for opposite side. Also great for wheel nuts that have been put on by garage with gun!

Undo the track rod and split the join removing the track rod end from the hub carrier. I then tied this up out of the way also. 

Gentle tap with a drift and hammer on the drive shaft started to separate that from the splined hub carrier. 

Now in theory if you undo the three retaining nuts in the engine bay on top of the Shock and everything else is removed and loose the whole unit should drop out of the suspension turret and lift off of the lower swinging arm. OH NO! It didn't! I tried jacking up the whole unit to straighten the join to the swing arm for the spigot to drop out of the hub carrier. No joy. After much swearing and cursing and trying many different angle and approaches, myself and my neighbour (great mechanically minded chap)(years of running LR's and his XJ6) we resorted to a bit of brute force to try and split the joint. This after a few hours resulted in me ruining the bush on the lower swing arm!! End of play for the day. Resort to drawing board, regroup and plan new angle of approach.

I then read up on removing swing arm altogether as this looked like it might be easier. 2 bolts hold it in place what could be more difficult I hear you say. Well! Firstly remove the plastic wheel arch trim to get to the bolts. Then the front horizontal bolt screws int a captive nut BUT there is an zircon pipe that runs just slightly in the way of getting a socket on the nut. So I used a door wedge to push gently the pipe up Then could get a ring spanner on and using a short length of scaffold tube as a lever got the bolt moving. Ratchet spanner did the rest. 

The rear bolt is a nut and bolt and came undone easily until you realise that the bolt has to go up to remove it! Great as the bolt is something like 125mm long and the gap between the top of swing arm and chassis is about 25mm!!! Mmmm what way do we go now. I saw a video of someone using multiple spanners and crowbar and eventually after much hard work managing to wriggle it out. Far too much for me. So I ordered 2 new nuts and bolts at a cost of £6 total (genuine Jag from Jag Classic parts) and hacksawed the old bolt off at the top so it could drop out. On refitting just put the bolt in from the bottom and nut on top. Its loctited and torqued. Bobs your uncle and all that sorted.

Now when I slid the whole swing arm out of the chassis the whole unit came away easily and the hub carrier just fell away from the spigot no problem. 

Compress the spring to remove the top mount bolt and then you can remove the top mount bearing and then slide off the spring. You do need to compress the spring considerably to be able to relieve tension on the mount. I used 2 sets of spring compressors to do the job safely.

Using a rather large hammer I knocked the hub carrier off the old shock with a bit of wood between to protect metal and removed the 2 brackets from the shock for re use.


WOW

Not my idea of having fun ............. , Good for you Colin. The photos will be easy for you. You just press 0n the logo below "choose files" , click on the photo you want to list and it will do it for you automatically.

Good Luck, Best Wishes and Regards, John

Join the conversation

You can post now and register later. If you have an account, sign in now to post with your account.

Guest
Reply to this topic...

×   Pasted as rich text.   Paste as plain text instead

  Only 75 emoji are allowed.

×   Your link has been automatically embedded.   Display as a link instead

×   Your previous content has been restored.   Clear editor

×   You cannot paste images directly. Upload or insert images from URL.

Loading...


×
×
  • Create New...


Forums


News


Membership


  • Insurance
  • Support